sabato 20 novembre 2021

REAMPING: How to reamp a guitar track (part 2/2)

CLICK HERE FOR PART 1/2

Following the instructions of the first part of the article, the setup should be ready: we should have a nice DI track, recorded at the right level, and all the routing in the DAW and in the sound interface software should be correctly set up: our guitar track is ready to be reamped!


4) Now we need to go from the audio interface output we have chosen for the DI track (in our example we have choosen the output n.3) into a REAMP BOX. What is a reamp box? It's a box that does exactly the opposite of a DI box: it takes a balanced signal (the one that comes out from the audio interface) and turns into an unbalanced one, meaning one at the right level to be fed into a guitar amp input (if you want you can also pass through pedals etc. before entering the amp, but remember that the signal comes out from the reamp box usually with more noise compared to if it would come straight from a guitar). Once the reamp box is plugged into the amp, we need to adjust the output level of the box in order to be the as loud as if it would be coming directly from a guitar.

5) Once the cables are plugged, it's time to press play on the DAW and let the song go: if we have done everything correctly, from the DAW monitors (or headphones) we should be able to hear the whole song, and from the amp we should be hearing only the correct guitar track. 
This is the moment in which we find the right tone in the amp, so let's take our time in finding the right gain, eq, effects etc.


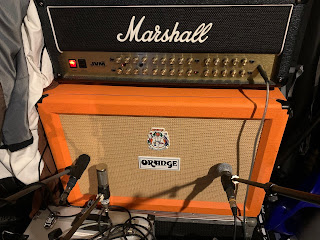
6) The last step is obviously the microphonation one: once we have a tone we like, we can start having fun, trying out all the microphones we have until we find the best combination and positioning among them (click here for some ideas), and the only remaining thing to do is to press record and enjoy our reamped track!

I hope this was helpful!


CLICK HERE FOR PART 1/2


Become fan of this blog on Facebook! Share it and contact us to collaborate!!

sabato 13 novembre 2021

REAMPING: How to reamp a guitar track (part 1/2)

Hello and welcome to this week's article!

Few years ago we have done an article about reamping (click here for the main article): now it's time to see in detail, step by step, how to reamp a guitar track.

The first thing to lear is how to route your channels to make sure that from the output channel of your audio interface only the guitar di signal comes out, while from your headphones or monitors you can keep listening to the whole project.

First off: you need to have in your project a DI guitar track, then, since usually all the tracks go to the stereo out, we need to steer this one away from there and make it go to a separate exit of our DAW and audio interface, an exit in which only our guitar track will be.

Today we're using the Presonus Studio One interface, but it should work more or less like this in every DAW: 

1) Go to song setup -> inputs and outputs and create a new mono output besides the standard stereo one (I've called it reamp, and the M there stands for Mono).


I have chosen "LINE 3", which means that when I assign the DI track to the output named "reamp" it will be listenable only by plugging the headphones to the output n.3 of my audio interface.

2) While all the tracks are assigned by default to the main out, meaning they will all end up into the stereo out buss (in the pic it's called "principale", because my interface is in Italian), I have changed the out for my DI track into "reamp", the new output we have created.


3) now we need to assign this "reamp" out to the physical out n.3 in my audio interface (you can assign it obviously to any out you want, just make sure the DAW and the output you're using in your interface are matching), and in order to do this we need to open the control panel of our audio interface, in my case it's the Saffire Mix Control from Focusrite.


In this case I assign "DAW 3" (which means the output to which we have routed our DI track in the DAW, which as you can see in the first picture is the out called "line 3") and we assign it in the "line output 3" slot (red arrow in the bottom of the pic), and we also assign it to a channel in the virtual mixer (red arrow in the top).

Now if everything went according to the plan, if we plug the headphones to the main headphone out of the audio interface we should be able to hear all the tracks going into the stereo buss EXCEPT the guitar DI one, while if we plug them into the out n.3 we should be able to hear only our DI track.

Once this complex preparation phase is done, it's TIME TO REAMP!


CLICK HERE FOR PART 2/2


Become fan of this blog on Facebook! Share it and contact us to collaborate!!
 

sabato 6 novembre 2021

Review: Harley Benton G112 Vintage


Hello everyone and welcome to this week's article!

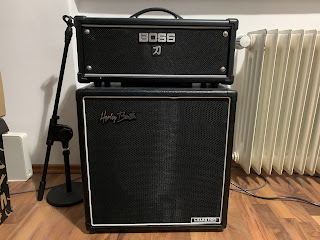
I was looking for a small 1x12 cabinet for my travel setup (which consists in a Boss Katana 100 head), and my idea was to look for one with a Celestion Vintage 30 speaker, which is a standard for rock and metal.
The V30 speaker is particularly good for hard music because it can handle high wattages (60w nominal power rating) and because it provides a strong low-mid thump and mid range, which is particularly suited for lower tunings and palm muting.

While browsing around for cabinets, I've stumbled upon the Harley Benton G112 Vintage, a cabinet made in China and imported from the German Shop/Distributor Thomann, and given the surprisingly low price (lower than the price of the speaker itself if bought separately!) I have decided to give it a try.

The cabinet is black, of the size of the average 1x12 combo amp, not particularly light nor heavy, and with a half-open back to retain a bit more low end, which is useful since it's quite small.
On the back there is only one input, 8 ohm mono, which makes it not very flexible but it's the most common choice and it's supported by basically every amp, and in general this cabinet has a pleasant look and feels solid in build quality. 

How does it sound?
It sounds quite well! The speaker has the unmistakable V30 tone, and the Katana head roars through it with no problems, plus this setup makes also a very good companion for home recording, because the Katana head can be used also at lower wattages, and the cabinet lends itself nicely for any type of microphoning, also at low volumes.

Do I suggest it? Hell yeah! At this price it has basically no competitors, and I don't see any reason not to buy one.

Thumbs up! 


Specs taken from the website:


- Equipment: 1x12" Celestion Vintage 30 speaker

- Power rating: 60 W

- Impedance: 8 Ohm

- 18 mm Poplar plywood housing

- Half-open rear wall

- Rearloaded

- Trim strip

- Carrying handle

- Dimensions (W x H x D): 460 x 470 x 299 mm