Visualizzazione post con etichetta HOME RECORDING. Mostra tutti i post

sabato 20 novembre 2021

REAMPING: How to reamp a guitar track (part 2/2)

CLICK HERE FOR PART 1/2

Following the instructions of the first part of the article, the setup should be ready: we should have a nice DI track, recorded at the right level, and all the routing in the DAW and in the sound interface software should be correctly set up: our guitar track is ready to be reamped!


4) Now we need to go from the audio interface output we have chosen for the DI track (in our example we have choosen the output n.3) into a REAMP BOX. What is a reamp box? It's a box that does exactly the opposite of a DI box: it takes a balanced signal (the one that comes out from the audio interface) and turns into an unbalanced one, meaning one at the right level to be fed into a guitar amp input (if you want you can also pass through pedals etc. before entering the amp, but remember that the signal comes out from the reamp box usually with more noise compared to if it would come straight from a guitar). Once the reamp box is plugged into the amp, we need to adjust the output level of the box in order to be the as loud as if it would be coming directly from a guitar.

5) Once the cables are plugged, it's time to press play on the DAW and let the song go: if we have done everything correctly, from the DAW monitors (or headphones) we should be able to hear the whole song, and from the amp we should be hearing only the correct guitar track. 
This is the moment in which we find the right tone in the amp, so let's take our time in finding the right gain, eq, effects etc.


6) The last step is obviously the microphonation one: once we have a tone we like, we can start having fun, trying out all the microphones we have until we find the best combination and positioning among them (click here for some ideas), and the only remaining thing to do is to press record and enjoy our reamped track!

I hope this was helpful!


CLICK HERE FOR PART 1/2


Become fan of this blog on Facebook! Share it and contact us to collaborate!!

sabato 13 novembre 2021

REAMPING: How to reamp a guitar track (part 1/2)

Hello and welcome to this week's article!

Few years ago we have done an article about reamping (click here for the main article): now it's time to see in detail, step by step, how to reamp a guitar track.

The first thing to lear is how to route your channels to make sure that from the output channel of your audio interface only the guitar di signal comes out, while from your headphones or monitors you can keep listening to the whole project.

First off: you need to have in your project a DI guitar track, then, since usually all the tracks go to the stereo out, we need to steer this one away from there and make it go to a separate exit of our DAW and audio interface, an exit in which only our guitar track will be.

Today we're using the Presonus Studio One interface, but it should work more or less like this in every DAW: 

1) Go to song setup -> inputs and outputs and create a new mono output besides the standard stereo one (I've called it reamp, and the M there stands for Mono).


I have chosen "LINE 3", which means that when I assign the DI track to the output named "reamp" it will be listenable only by plugging the headphones to the output n.3 of my audio interface.

2) While all the tracks are assigned by default to the main out, meaning they will all end up into the stereo out buss (in the pic it's called "principale", because my interface is in Italian), I have changed the out for my DI track into "reamp", the new output we have created.


3) now we need to assign this "reamp" out to the physical out n.3 in my audio interface (you can assign it obviously to any out you want, just make sure the DAW and the output you're using in your interface are matching), and in order to do this we need to open the control panel of our audio interface, in my case it's the Saffire Mix Control from Focusrite.


In this case I assign "DAW 3" (which means the output to which we have routed our DI track in the DAW, which as you can see in the first picture is the out called "line 3") and we assign it in the "line output 3" slot (red arrow in the bottom of the pic), and we also assign it to a channel in the virtual mixer (red arrow in the top).

Now if everything went according to the plan, if we plug the headphones to the main headphone out of the audio interface we should be able to hear all the tracks going into the stereo buss EXCEPT the guitar DI one, while if we plug them into the out n.3 we should be able to hear only our DI track.

Once this complex preparation phase is done, it's TIME TO REAMP!


CLICK HERE FOR PART 2/2


Become fan of this blog on Facebook! Share it and contact us to collaborate!!
 

sabato 30 ottobre 2021

Different types of microphones for guitar and common combinations among them


Hello everyone and welcome to this week's article!

This time we're going to check out the various types of microphones we can use to mic a guitar amp, and this article can be considered as a supplement to the basic one "how to mic a guitar amp".

Assuming that you have read our basic article and you are familiar with how the horizontal distance from the dustcap of the speaker can make the tone brighter or darker, here are 3 common mic combinations that you can try, it doesn't matter the exact microphone model you have (for example whether the condenser one is small or large diaphragm: the sound will be different, but the basic concept stays the same). 

First off: why to combine two microphones? Because every type of microphone has a different eq curve, curve that changes also according to the position from the speaker, so it happens often that one single microphone is not capable of capturing a tone that is full and has for example a detailed high end and a full low-mid area: most of the times trying to make everything with one mike leads to a compromise that can be good, but that rarely can be perfect in every aspect.
Using two microphones therefore allows us to use one for the low-mid area and one for the high end, and we can also use the faders in the DAW to choose the right balance.

Second note: every microphone type has different requirements, for example a ribbon microphone is fragile if left in front of high sound pressure, the ribbon can bend or break due to the air movement, so you need to use a volume that is not too high if you are using it for close miking, or a condenser microphone needs phantom power, but you need to make sure that the phantom is deactivated in the channel of the ribbon one, otherwise the ribbon microphone will break.
It's a good idea in the studio, when using condenser and/or ribbon microphones not to crank the amp volume too much, it's sufficient to arrive to see a little bit of movement in the speaker.


Dynamic + Condenser = this is a popular choice both in modern music and in the '70s one: the dynamic microphone should be placed straight or angled, mid way between the dustcap and the edge of the speaker and its role is to pick up the mids and low-end: the more it's pointed towards the edge of the speaker, the darker it will get. The distance should be a couple of centimeters from the grill cloth. 
The Condenser microphone instead will take high end, so it should be pointing towards the center of the dustcap, and its distance should be regulated according to the mic sensitivity: if it's very sensitive it's better to keep it 20-30cm from the speaker, maybe even 50, while if it sounds too thin or you hear that there is too much room in the track (and if the amp volume is not too high), it can be put as close as 5-10cm. If you feel like the tone capture by the condenser mic is clipping, lower the gain in the audio interface and/or back it off a few cm. 

Dynamic + Ribbon = this tone was used a lot in the '80s and produces a warm tone with a nasal mid-range (for example imagine a Guns'n Roses type of mid-range), the most classic technique is to put the ribbon microphone 2 to 10cm from the grill cloth pointing towards the dust cap, and the dynamic one right on the side, so that it points towards the edge of the dustcap, at around 2 cm from the grill cloth. This will create 2 complementary tones, with the ribbon microphone that is more dark and nasal to provide the body (but also part of the high end) and the dynamic one to bring more detail in the high end. 

Condenser + Ribbon = this is a less used technique but it's pretty interesting: the ribbon microphone placed as in the Dynamic + Ribbon technique, but pointing a bit more towards the edge of the dustcap (so the sound is even meatier), and the condenser one placed like described in the Dynamic + Condenser technique, to take all the detail in the top end. This technique is a bit more complicated but if handled well it can create very good results.


Finally, it's important when doing mic placement to check the phase coherence in order to avoid cancellations! Click here for a dedicated article.


And you? Do you know other good microphoning techniques? Let us know in the comments!


Become fan of this blog on Facebook! Share it and contact us to collaborate!!

sabato 23 ottobre 2021

Ribbon microphones: what are they and how they work


Hello everyone and welcome to this week's article!

Today were going to talk about ribbon microphones.
Ribbon microphones are a a particular type of microphone that use a thin ribbon of a conductive material (for example aluminum) between the poles of a magnet to record the sound, and this particular construction allows it to sound very pleasant, round and sensitive to certain frequencies, but at the same time makes it quite fragile, therefore it needs to be handled with more attention than a regular dynamic mike.

Ribbon microphones were first introduced in the early '20s of the past century, and they were praised to be the type of microphone more suited to reproduce the whole spectrum of human hearing (20hz to 20khz), and with the time, as per the other types of microphones, technology evolved and today we can count on microphones that are less fragile than before (although it's still importato to observe caution when handling them), made with more solid and durable materials, with various types of sensitivity pattern (cardioid, hypercardioid, variable, uni-directional, bi-directional and so on), active and passive.

The active ones work more like condenser microphones, meaning that they need an energy source in order to work (never use the phantom power on a passive ribbon microphone or some internal component will break!!), while the passive ones work like dynamic mikes, and are used often to microphone brass instruments and guitar amplifiers.

Speaking of guitar amplifiers, there are 2 main techniques which are very popular in recording studios, and that involve both a ribbon microphone (such as the famous Royer R-121) and the omnipresent Shure SM57: the most famous is the one in which the ribbon microphone is in vertical in front of the center of the dustcap, next to the speaker grill (to take the high end of the tone, since it doesn't sound too brittle or harsh), and with the SM57 pointing towards the edge of the dustcap, so it's slightly off the center and this way it captures a bit more the body of the tone.

The second technique is the other way around: the SM57 points towards the center of the speaker, essentially capturing the high end of the amp, and the ribbon mike is slightly away from the speaker grill (we're talking around 15cm) and off-center, so it will take more the low-mids part of the guitar tone.

Either way, it's essential to check out the position between the two microphones to minimize phase cancellation, so if you notice there are a lot of phase issues try moving one of the 2 microphones in order to align the phase, plus if the guitar amp volume is extremely high, it could be also a good idea to tilt slightly the ribbon mike off axis in order to prevent the sound pressure to hit the ribbon too frontally.

Obviously these are just a couple of the thousands of possible mic placements, but they are a good starting point when trying out a ribbon microphone.


Become fan of this blog on Facebook! Share it and contact us to collaborate!!

sabato 18 settembre 2021

Track Grouping Cheatsheet


Hello everyone and welcome to this week's article!
Today we're going to check out a visual representation of the track grouping of an average project, I have borrowed the idea from a similar cheatsheet I've found posted from a user (thank you, Toby!) on the URM Academy Facebook page, but I have modified it a bit according to my workflow and naming conventions.
I consider this visual representation an useful tool because it tidies up the concepts we have been already analyzing in detail in our home recording main article, and in our project preparation one.

Let's start by saying that this picture is by no mean a fixed rule, you can modify it according to your workflow, remove and add all the tracks/groups you need etc, but it could be considered as a solid starting point if you're new in mixing a project with with a full rock band and don't know where to start. 

Let's begin from the left, here you have all the individual tracks: almost all of them are routed into subgroups and/or groups, this is made to make you process the tracks in groups, if possible, thus saving time and computer resources (as opposed to processing them individually), and when you have your sounds right and the relative balance within the group, you can literally just move the group faders to balance the main parts of the mix among them (eventually balancing only the drums, bass, guitars, vocals, synths and fx groups, just 6 faders, is much easier and gives us a much better perspective once the ground work is done).

Why the Sub Drops etc... track is alone and goes straight into the Stereo Out? Because we don't want it to be part of the "Fake Master", we don't want all the low end of these tracks to hijack completely the buss comp creating a horrible pump effect. Eventually some pump effect can still appear when this track will reach the limiter, and we will have to be good in finding the right volume for it to arrive to the limiter without creating problems.

I hope this was helpful!


Become fan of this blog on Facebook! Share it and contact us to collaborate!!
 

sabato 21 agosto 2021

Pre-count, Pre-roll and auto punch! What are they and why you should use them.


Hello everyone and welcome to this week's article!

Today we're going to talk about three functions, present in basically any DAW, which are fundamental when recording any instrument, and that sometimes gets overlooked: pre-count, pre-roll and the auto punch.

Pre-roll is something that comes from the analog world, it means that the track would start playing, making you hear what you have already recorded, and then the engineer would, by pressing a button, start recording you on the fly.
Today we can automate this function, and order to enable it in Studio One you need to press the O hotkey, or click on the pre-roll icon (the first arrow in the pic).
Then, by clicking on the wench icon (the second arrow in the pic), which brings us to the metronome setup menu, we can simply tick on or off the pre-roll and/enter the number of bars to play before starting recording. 
This way, once you will hit record, first it will make you listen to the previous 2 bars, so you can start already playing along with them, and then it will start recording automatically at the right point.

From that same menu you can activate also the Pre-count, which means that before playing or recording it will first play a set amount of metronome bars, to be ready with the right tempo before starting recording.
This function is used if you're starting your track from zero, so you don't have any part to play as pre-roll.

How does the computer know exactly, especially if it starts from 2 bars before, where to start recording and where to stop?
You need to select the area with the mouse, the recording will start and stop exactly within the selected part of the track.

Auto punch instead is another function that puts you in and out of record, as the track is playing back, meaning that you need to have the record button assigned to a hotkey (in Studio One is by default the NumPad * button), and as you play a track you can press the * key in real time to start recording, and press it again to stop recording, all without stopping the track from playback, which can be useful especially when tracking vocals, if you want to re-do just a word here and there without interrupting too much the flow.

I hope this was helpful!


Become fan of this blog on Facebook! Share it and contact us to collaborate!! 

sabato 3 luglio 2021

Low latency monitoring (in Studio One)


Hello and welcome to this week's article!

This time we're going to talk about a theme that is often overlooked, but that is of paramount importance: the low latency monitoring, and in ordering to do it, we're going to use the interface of Studio One, but the same rules applies to every DAW.

There are 2 types of low latency monitoring: hardware and software.

Hardware low latency monitoring is the ASIO protocol (also known as Hardware Direct Monitoring), a protocol created by Steinberg, which basically lets the drivers of the audio interface to dialogue with the DAW and work together to allow the lowest latency possible for the configuration.

A particular type of low latency monitoring is called Blue Z, or "low latency monitoring for instruments", which is a bit more advanced than the classic ASIO one and it's a function supported only from certain audio interfaces (such as Presonus, RME etc), which allows you to monitor with almost zero latency without stressing too much the CPU, but will not let you hear the sound processed by regular plugins, just for some which are made for that (for example in Studio One you can add a delay or a reverb to the real time signal, those plugins are called DSP plugins).

The "software" low latency mode instead (which still anyway involves hardware as well) is the one called Green Z, or "Native Low Latency Monitoring". This mode is more advanced, and it's supported only by few, more recent interfaces and computers, and allows the signal to pass through the whole chain of effects and come out as fast as with the regular hardware low latency monitoring, but it requires also a comparatively faster computer.
Studio One, unlike other DAW, allows you to choose different settings for the buffer size, which is the protection from jitters when doing playback, and the so called "device block size", which is the buffer size for recording: the lower it is, the faster.
This way you can set "dropout protection" medium or high, to make sure there are no jitters, and then just set the device block size as low as possible to minimize the latency, and finally enable the "green z" in the mixer on the tracks you are recording in real time to use this function that minimizes the latency and also lets you hear all the plugins in real time.

The more the cpu is struggling by making many tracks passing through real time processing, the more we will need to balance, for example by increasing the buffer size (and therefore the latency), or the dropout protection (to avoid hearing weird noises during the playback, which is anyway a function tied to the buffer size), so anyway monitoring is a balance game: we need to be aware of how much we need low latency (if we are recording we do, if we're mixing we don't) and change the settings according to the phase we're in.


Become fan of this blog on Facebook! Share it and contact us to collaborate!!

sabato 26 giugno 2021

Difference between old school and modern guitar distortion


Hello and welcome to this week's article!

Today we're going to clarify a bit what are the characteristics of the old school guitar distortion and the modern day hi-gain tone.

Let's start from the base: a distortion is an effect achieved by taking a signal and boosting it on purpose in order to make it become degraded, but in a controlled, euphonic way, with the aim of making it sound more aggressive and compressed, and this is exactly how it went initially; guitarists were plugging their guitars into tube amps and cranking them to the maximum (also because at the early stages there wasn't even what we might call today a p.a.), and the amps just couldn't handle it, so distortion was an unexpected (but usually welcomed) side effect.

Then Hendrix and rock n'roll in general exploded, guitarists were experimenting with their tone like crazy and pushing the boundaries with every record, and the amp producers simply adapted to the needs, creating amps (and pedals) capable of distorting on purpose without the need of putting everyting on 10.

Back in the day of the first hi-gain amps, distortion was permeating the whole frequency range, because it was generated both by the gain stages of the preamplifier and from the power amp, stressing its power tubes, and a good example of the early amps which featured a high-gain tone were the Marshall and the Orange amps of the '70s among the others.
An Orange amp is a good example of old school distortion: it's prominent in the low-mids, which makes it a bit dark sounding, and it's very distorted in that same area, making the tone not very defined and not easy to control, but very punchy for example with groovy single string riffs, like many Led Zeppelin ones, in which every note hits you like a truck.

Modern guitar distortion instead is all about control. This is obtained from amps which through the years had more and more gain stages and which relied less and less on the power amp to distort, until we arrived to amps with large tube power amps (e.g. 120w), with 6L6 power tubes which have a lot of headroom, and all this is to make the power amp sound clean and the amp to rely mostly on the preamplifier for its gain.
This different setup has 2 objectives: 1) to stress less the power amp, thus prolonging the life of the tubes 2) to have a cleaner, tighter low end.

To make the distorted sound even tighter, guitarists like to take a hi-gain head (for example a Mesa Boogie or a Peavey 5150), use the distorted channel and boost it with an overdrive, because it makes the input signal even hotter and the result is a tone with a fast attack, reduced low-mids and a tighter low-end (meaning that when playing a fast, palm muted riff the recoil of the lows is faster and less prominent, so you can hear the riff more clearly).

This solution is particularly good with low tunings (to be honest today it's very hard to even find a band that plays contemporary hard rock-heavy metal in E), because it adds clarity, so in conclusion the modern distortion is about a tight, controlled low-end (which needs to sound clean, because if it's too distorted the riff will sound like a mess, to the point that some metal amp has a separate gain knob for the lows and one for the highs) and a screaming, very defined upper mid range, with a clear attack and good string separation, if you want to play some articulate djenty riff like those of Periphery.

Clearly I have provided the example of 2 very different type of tones and there are surely a million tones in between the old school and the modern one, but I felt like explaining this difference, because it can help defining more the type of sound we have in mind.

Which one among the 2 do you prefer?


Become fan of this blog on Facebook! Share it and contact us to collaborate!!

sabato 6 marzo 2021

What is a sustainer? (with free VST plugins)


Hello and welcome to this week's article!

Today we're going to talk about a type of guitar effect which is often overlooked, but that in some genre can make the difference: the Sustainer!

Let's start with the basics: the sustain is one of the four parts of a sound (click here for a dedicated article), meaning for example with the guitar, how long it passes between when you pluck a string and when the volume goes back to zero.

If we're playing the clean channel of an amp, the cleaner it is the shorter in theory the sustain is, while at the opposite, adding gain adds also compression, which keeps audible also the quieter parts for longer, with the result that the tone has more sustain.

Sustain can be added either by adding gain, distortion, tube saturation or directly by using a compressor, and the original, beloved sustain was actually a product of the signal overdriving the guitar amp tubes, which were not (voluntarily) distorting the tone, but producing a saturated clean channel which provided sustain, and made playing solos more easy.
By adding stages of gain and distortions, reverbs and delays, the guitarits have found many ways to add sustain, but all those methods change dramatically the tone, and sometimes this is not what the guitarist needs:

Sometimes what a guitarist need is a tone that is clean or just slightly distorted, but with an incredibly long sustain, so that all the nuances of the solo are audible and the beauty of the guitar tone can arrive to the listener without being completely disfigured by the other effects, as you can hear for example in the solos by David Gilmour of Pink Floyd

This is where compressors comes into play: a compressor, if set in a way in which it boost the lower part of the signal without affecting too much the rest of the tone, can offer an alternative to the high volume tube compression of a saturated amp, and this has been the success of stompboxes such as the Boss Compressor/Sustainer.

Today in studio there is not even anymore the need of using a hardware sustainer, it is sufficient to have a VST one, and usually the guitar amp suites have some sort of compressor/sustainer bundled, but if you don't happen to have one, you can try one of these 2:


7amp Peak Sustainer - a free sustainer plugin

Hornet HCS1 (demo) - a paid compressor/sustainer


sabato 20 febbraio 2021

Clean guitar tone from a distorted one (and why you should use it)


Hello and welcome to this week's article!

Today we dive back into the guitar world talking about tone, and specifically about a trick that has been kept secret for quite some time: the perks of getting a good clean tone by rolling off the input level that enters a distorted channel.

Usually when dialing in a clean tone we start from the clean channel of an amp, whether it is a real one or a plugin, and we work our way around from there, but there is an alternative way that in some case can sound even better: in some amp, in facts, the clean channel can sound a bit too weak, too cristalline, too "cold", while sometimes the type of clean we are looking for is richer in harmonics, at the limit of the breakup (the point in which it starts saturating and entering almost in the overdrive territory); we can be looking for a tone that is more full in the lower-mid range, and not always this is obtainable from the clean channel.

So what do we need to do? Do we lower the volume?

No. That one can stay fairly high, for example at noon: what we need to do is to lower the input level (if we're using a plugin) or lower the guitar volume by moving the volume knob in the guitar, and this way the signal coming into the amplifier will be weaker (but make sure to turn off any noise gate, or else it will fall below threshold and be cut).

Once the guitar signal will be lowered, the amp will not have anymore enough signal to produce a distorted output, and will give you a very warm tone, much fuller and warmer, and almost "out of focus" compared to the "zing" of the clean channel, in which you can really hear the brightness of the string. 
Now it's time to adjust the master volume in order to compensate for the lower input volume, and this (especially if we're talking about tube amps) will add an additional layer of saturation and harmonic richness, so dose it carefully.

Finally, note that this method of obtaining a low gain/clean tone will need eq adjustments in order to restore some brightness, and maybe to tame some low mids, which will become quite prominent.  


Become fan of this blog on Facebook! Share it and contact us to collaborate!!

sabato 6 febbraio 2021

What is the right buffer size to record and to mix?


Hello and welcome to this week's article!

This article is a look more in depth to a topic that we have already seen here: buffer size and latency.

Basically the idea is to record at lower buffer size and mix at higher buffer size.

Why? Because the lower the buffer size, the lower the latency, therefore if you are using for example a virtual amplifier it will sound more "real" under your fingers, but it will be heavier on the CPU, while with a higher buffer size there will be more latency, but if you're mixing this is not a problem: it doesn't matter if it takes even half a second or more between when you press play and when the reproduction starts.
When playing, instead, having half a second of delay between when you play and when you hear it makes it literally impossible to play an instrument.

Is there a sweet spot between the settings? It depends on 2 factors: 

1) how powerful the computer is

2) how heavy is your session: the more plugins you have, the harder it will be for the CPU to process everything in real time.

That's why it's suggested to use different settings when recording and when mixing: when mixing you can keep it around the maximum settings (1024, or 2048), which makes the project a lot less CPU intensive.
When recording, instead, the aim is to keep the latency at around 10ms or less, and usually this is a setting that you can obtain with 128 or 256 buffer size. 
There is no real need to get too low, like 64 or lower, because this way unless the project is basically empty, you can start experiencing clicks and pops here and there, because the CPU struggles too much.

And you? What buffer size do you use when mixing and mastering?


Become fan of this blog on Facebook! Share it and contact us to collaborate!!

sabato 19 dicembre 2020

Volume inconsistency: solve it with the clip gain/event gain tool


Hello and welcome to this week's article!

Today we are going to talk about an ongoing topic, the one of gain staging, and the problem we're going to tackle is the one of the volume inconsistency.

When recording an instrument with high dinamic excursion (mainly vocals, for example), the professional recording engineers usually make the signal pass through a minimum of processing to make sure it arrives in the daw in such an optimal condition that it will already sound decent and require less mixing/digital processing, and usually we're talking about a little bit of compression (just to shave off a couple of db to reduce the difference between the loudest and the quietest parts), a little bit of de-essing and a high pass filter to rolloff the unnecessary subsonics; this is usually done in hardware preamps or good mixing boards.

Unfortunately in the world of home recording a good hardware compressor is not always at hand, and the vocals are recorded directly in the input of the audio interface, and often the level of the interface is set in order not to clip, so the engineer asks to the singer "scream as loud as you can", adjusts the volume so that it doesn't clip and leave it like that for the whole recording session. 

This leads to a HUGE dynamic excursion, to the point that in the same track there will be parts inaudible (and invisible graphically) and others that will take all the headroom possible, and we will have to compress the s*** out of the track to obtain a little bit of consistency in volume, with the downside that when the compression is too strong it unavoidably will end up coloring/deteriorating our track a lot.

How to solve this problem? It's easy, with a tool called Clip Gain (in some DAW, for example in Pro Tools) or Event Gain (in Studio One):  it consists in cutting the track in sections with the same gain and adjusting them, by raising the parts that are too quiet and lowering those which are too loud in order to make them more consistent, so that when the track will hit the compressor it will do its job in a clean and pleasant way.

In order to change the event gain you need to click and hold the little square in the upper middle part of the event and drag it up or down to add or remove gain.

This operation belongs more to the Editing phase than to the mixing one, and it's somehow a bit boring and long, but believe me, if you arrive to the mixing phase with a volume that is consistent throughout the track before reaching the compressor, it will make a world of difference, also because riding the volume, which is something that was done before the existence of compression to keep the volume stable, is actually a cleaner way to set the right gain rather than compressing, and this is just a way to do it not in real time. 

I hope this was helpful!


Become fan of this blog on Facebook! Share it and contact us to collaborate!!

sabato 1 agosto 2020

What specs to check out before buying an audio interface


Hello and welcome to this week's article!

This article is to be considered as an expansion of our article about audio interfaces (click here to check it out), and this time we're going to check out a bit more in depth the tech specs.

As per every other tech product, also audio interfaces are placed in the market in various price ranges, which can go from 60 bucks to well over one thousand (or more), and yet they all promise the same thing: to record an input signal, convert it from analog to digital and send it to your computer, usually letting you also plug an output device such as monitors or headphones.

Why the price difference then?
Because of two things: the specs and the support.
Let's start from the support: when choosing an audio interface support gets often overlooked, but it actually is even more important than the specs themselves.
You should thing about keeping the interface for several years, and if the support is not good, if there are bugs they will not get solved (and often in the first release of the drivers there is something to be fixed), or if you change your os (for example to a newer version of windows) and the support is not good, it's very likey that they will not relese the drivers for the new version, making the interface unusable (and this happens more often than you think with cheaper brands, which is infuriating).

Moving to the specs, here are some to check out when choosing an interface (obviously there are many more than these, but these are the most important ones):


Sample rate: this number tells you how often the device checks out the audio signal and records its amplitude, so it's basically the speed at which the analog sound is rendered into a digital signal.
The most common sample rates are 44.1 khz, 48 khz, 96 khz, 192 khz.
In case of 96khz for example, the interface "photographs" the incoming sound 96'000 times per second. 
These sample rates also tell us the maximum frequency the interface can record, which is the half of the sample rate number (for example in the case of 44.1 khz is 22.05 khz, which is still more than the usual human hearing, which ranges from 20 hz to 20 khz).
When recording music, it's suggestable to have an interface capable of recording at least at 48 khz.

Frequency response: this shows you the sensitivity of the device, and tells you the range on which it operates, for example 20 hz to 20 khz. This number is also modified from other factors, for example microphones, which can create a funnel effect.

Bit depth: it tells you how many bits are used for each sample recorded, and this influences the dynamic range of the interface. Having more bits means being able to record with higher dynamic ranges (therefore with a lower noise floor). 
16 bit: it's possible to achieve a dynamic range (theoretical) of 96 db
24 bit: it's possible to achieve a dynamic range (theoretical) of 144 db

Dynamic range: it's the ratio between the loudest signal that can be recorded by the interface and the noise floor, and it's measured in dbA (decibel A-weighted). 
The more dynamic range there is, the lesser the risk (when for example compressing the signal) to raise the noise floor to a point that will ruin our sound. 
In order to avoid these problems, it's suggested to use an interface with a dynamic range of 100 or more dbA.

Gain: often in the interface specs there is written something like "Gain 0-60db", which means that the gain knob can amplify the incoming audio signal up to 60db. If the preamp applies a minimum of +10db to a maximum of +60db, the Gain Range (the distance between the minimum and the maximum) is 50db.

EIN: it's the equivalent input noise, a way of stating the preamplifier noise of a recording device. When recording from a source such a microphone, the signal needs to pass through a preamp in order to raise to the desired gain level, and each preamp has a certain amount of intrinsic noise, which should be as low as possible.
Ein is measured in dbU (which are always negative numbers), and the lower the number, the lower the noise.
EIN is a good system to compare the noise level of two different interfaces, to see which one is better (for example -130 dbu is considered a very low noise preamp, while from -120 dbu up the noise starts becoming noticeable).

I hope this was helpful!


sabato 25 gennaio 2020

The difference between open back and closed back headphones


Hello and welcome to this week's article!
Today we're going to talk about a topic that came up during the recording sessions of a demo I've been recently taking part to, and it turned out to be an interesting discussion.

Which is the ideal type of headphone to use when recording and when mixing (click here for an article about mixing with headphones vs. mixing with monitors)?


Open back headphones are those that usually have a grill in the back of the earpiece, this prevents the sound pressure to build up inside the ear cup and the sound waves to bounce for too long.

The pros:

- these are better headphones for mixing and mastering because the sound is more clear, since especially the lower frequencies doesn't remain trapped in the earcup giving the impression that there is more low end in the song that there actually is.

The cons:

- low isolation: due to the grill, the sound from outside is easier to hear (which is bad).
- sound leak: always due to the grill, the sound from inside spills out. Both these two points makes these headphones not suggested for outside use (e.g. in public transports).


Closed back headphones instead doesn't have the grill, and the sound remains longer inside the ear cup bouncing, therefore it sounds more loud and messy, and a bit less clear.

The pros: 

- these headphones isolate the sound better in both ways: from inside and from outside, therefore they are used when recording, because they don't have a lot of bleed (unlike the open back ones), and because they isolate better from the external sounds, allowing the musician to focus on their own performance.
- for the same reasons mentioned above, this type of heaphones is also good when listening to music outside, for example when commuting to work.

The cons:

- if you mix with closed back headphones there are big chances that the final sound will not translate to the other sources as you expect, because they doesn't provide a flat representation of the sound spectrum: they emphasize the low end and makes the high end a bit cloudy.
- they are heavier and makes the ears sweaty, which in long sessions can be a problem.


In conclusion:

For tracking buy a good pair of closed back headphones, that can isolate well the sound from inside to prevent it from bleeding into the microphones, while when mixing and mastering use some good level open back ones, because they will allow you to obtain better sounding mixes, that translates better also in the other devices (computer, car stereo etc).

I hope this was helpful! 


Become fan of this blog on Facebook! Share it and contact us to collaborate!!

sabato 11 gennaio 2020

Signal to noise ratio: a guide for dummies


Hello and welcome to this week's article!

This article is to be considered an expansion of our Gain Staging article (click here to read it), in which I would like to elaborate more about the signal to noise topic.

When we record an audio sound (regardless of whether we're using an old analog tape recorder or a modern digital workstation) we are actually capturing certain frequencies, those that are audible from our microphone, and putting them into a "corridor" that has a floor and a ceiling.
If the recorded signal is too high it will "bump" into the ceiling and will distort, if it's too low it can become inaudible, therefore we need to find a level in which it can be heard properly without clipping.
This amplitude is controlled through the "Gain" knob of the preamplifier we're running through, and since we know that there is a "floor" and a "ceiling", there is also a sweet spot that we must find with the best signal-to noise ratio; the distance between the signal and the ceiling is called Headroom.

One thing that is important is that in the "corridor" I was mentioning, the floor is the level below which our preamp can't hear any sound, and this minimum level of signal (which is always present when recording, even if there is total silence) is called "noise floor", which is the lowest limit recorded from the source going into the preamp.
This noise floor can be pushed further down by changing the bit depth of the project, if the audio interface supports it: the higher the bit depth, the lower the ground noise level, but it can never be removed, and if after we have recorded a sound we realize it's too low and we increase the volume of that track in our DAW for example, we will increase more or less proportionally also the noise floor by the same amount of decibels (which is very bad).

How to calculate the signat-to-noise ratio = Signal Level MINUS Noise Level.

Example: the noise level peaks at -50db, the signal level peaks at -20db, the signal to noise ratio will be 30db (the distance between -50 and -20).

To sum it up, the lower we will set the input gain, the higher proportionally will be the signal-to noise-ratio, meaning that the related noise will be more and more prominent when we will turn the signal back up, so always make sure you are recording with the right input level, not too low to avoid the noise but not too high to avoid distortion: a good starting point for your DAW it's to set the projet to 24 bit and set the input gain of your audio interface so that the signal will peak at around -12db, this will give you enough headroom for the various further steps of the audio production.

I hope this was helpful!


Become fan of this blog on Facebook! Share it and contact us to collaborate!! 

sabato 28 dicembre 2019

How to use Strip Silence (a guide for dummies)


Hello everyone and welcome to this week's article!
Today we're going to talk about editing (click here for a dedicated article), and about how far technology has arrived, with the automatic identification and cut of silence parts.

Editing, especially if we're talking about a complex multi track (or even multi-song) project can be frustrating: it takes surgical precision, zen patience and countless hours if we want really to align the transients and insert silence in the right spot in our tracks, but today technology can give us a hand, by identifying a defined threshold and simply cutting automatically the track where it's supposed to, saving us literally hours.

Inserting silence in a track can be fundamental for our project, because it eliminates completely the ground noise (espacially in live projects or songs in which all instruments are playing together and the microphones inevitably pick up some sound, called "bleed", coming from the other instruments).

The Strip Silence feature is present in all the major DAWs: we're describing today the Studio One method, but it can be found easily also in the other workstations, and it works in the same way.
In Studio One you just need to click on the Strip silence icon located in the top area of the interface, and a menu will pop up: we can choose between some presets in the menu called "material", which are made to cut away just the ground noise, or to insert silence more and more aggressively, then we can decide the threshold below which to trigger the cut and the attack and release (that in this case are called "pre roll" and "post roll", which will create also a fade in and out curve to not make the cut too violent.

Basically the Strip Silence function as you might have guessed works as a Gate (click here for a dedicated article), that instead of lowering the volume under a certain threshold to zero, creates a cut in the track, which has a dual function: to free up headroom to the maximum and to prepare the track for some timing adjustment, saving us time when editing.

All it takes is just the initial settings: if we're working on a vocal track for example, we need to fiddle until we nail the right setting that doesn't cut where we don't want and doesn't stop the track too early or too late, once we have found the perfect setting we can apply it to the whole track (by selecting the track/s we need to process and pressing "apply") and from there do the needed manual adjustments.

Sometimes even if we have a very low noise floor, if we don't eliminate it completely and if it's present on several tracks, it will add up and in the final song and we can end up having a considerable amount of background noise, that will even increase with bus compression and mastering, so it's better to enter these stages with as little ground noise as possible, and for this task, the strip silence function is our best tool.

I hope this was helpful!


Become fan of this blog on Facebook! Share it and contact us to collaborate!! 

sabato 30 novembre 2019

How to connect a mixer to an audio interface


Hello and welcome to this week's article!
Today we're talking about a problem that probably many musicians have encountered: how to connect a mixer to an audio interface, for live or studio purposes.

Today there are in commerce several types of mixers with audio interface function, capable of transfereing the data directly to our DAW without passing through an audio interface: some of them can even split every single channel to a separate audio track, while others can export only to a left and right track.

The reality, though, it's that 80% of the mixers around doesn't have an usb out, therefore we will need to plug them somehow to our audio interface in order to record through them.

Why would we need to pass through a mixer?
Simple: to use more microphones than the inputs in our audio interface, for example we can use an 8 track mixer to mic a live drumkit (or a live band, or our rehearsals if we feel fancy), make a relative mix on in and connect the left and right output tracks to our audio interface to record it in our daw.

What we need in our interface it's basically just 2 TRS line level inputs, so we need to go with a regular jack from the 2 MAIN OUT outputs of the mixer (left and right) into the 2 line inputs of the audio interface.

Now we need to take care of the gain staging: before turning on the mixer, set the gain knob on each track to zero and the "main mix" level to unity (12 'o clock).
Once the mixer is on, slowly rise the gain knobs of each track until the recorded levels arrives at around 0db in the output meter, but without clipping.

Now take a look at your DAW and adjust the gain knob in the audio interface to make sure the input level is not too low nor too high. Once you find the optimal level, that is not clipping but that can record everything clearly, the gain staging is done

So far we have talked about connecting a mixer to a 2 input audio interface, but there are mixers that have also separate audio outputs, and audio interfaces with many

Now you're ready to record, enjoy!


Become fan of this blog on Facebook! Share it and contact us to collaborate!! 

sabato 27 luglio 2019

Shure SM57 vs Sennheiser e609 (with video comparison)


Hello and welcome to this week's article!

Today we are going to compare two schools of thought, the two most common and beloved dynamic microphones for electric guitar: the Shure SM57 and the Sennheiser e609; two industry standards in the same price range, super solid and capable of whitstanding huge sound pressures.

Those two microphones features a similar sound curve, meaning they are particularly receptive towards the midrange, which is very common and useful when microphoning a guitar speaker, especially in a live environment, but they have their own characteristics.
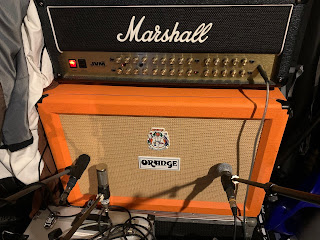
For our comparison we have microphoned the same cab (an Orange 2x12) through the same poweramp (a Marshall Jvm) exactly in the same position (straight towards the edge of the dustcap), in order to tell better the differences.

What we can hear is that while they are both mid rangey, the Shure has much more low-mid content and less high end, which is why it gets paired often in studio with other microphones that add some sparkle, while the Sennheiser is more scooped, slightly less musical but much more aggressive, which makes it more suitable for certain kinds of music or tunings.

It's interesting to notice also the interaction between the two microphones in the sample, when they are played together: they sort of complete each other, and this is one of the reasons why many albums are quad tracked with both microphones on both sides: because they sound fuller.

Which one to choose? We suggest you to download our free impulse pack and try for yourself, with your guitar and your music stile the one that sounds better!


Something about the video:

First you can hear the sample recorded with the SM57 on both sides, then one with the Sennheiser on both sides, then one with the Shure on the left side and the Sennheiser on the right one, and finally the same samples without drums and bass.

The impulse used is the one done by us, the free Trident pack (click here to download), and we used the impulse on the orange cab, pointing towards the edge of the dustcap.

Signal chain: Ltd MH-417 - Focusrite Saffire Pro14 - Ignite TSB-1 - Nick Crow 7170 - Ignite NadIR - Trident Impulse pack (no post eq used)

Let us know what do you think!


Become fan of this blog on Facebook! Share it and contact us to collaborate!!

sabato 13 luglio 2019

Presence and resonance controls in a guitar amplifier


Hello everyone and welcome to this week's article!
Today's article is a small analysis of what are those two additional controls that sometimes are featured on guitar amplifiers, and that sometimes have a different meaning from brand to brand.

Presence and resonance controls are less intuitive than other knobs (Eq, Gain, Reverb...), but are quite important as tone shaping tools, because when they are available, they let us modify dramatically our tone, adding a lot of versatility to the amp.

Let's start by clarifying that the aforementioned controls Gain and Equalization are the tone shaping controls of the preamp, and usually the eq is subtractive, meaning that it filters out frequences in that range unless you put it to max (but not in all amps), while Presence and Resonance affects the power amp section, so their shaping takes place after the preamp stage.


- Presence is an UPPER MID BOOST, which means that it adds upper mids to the sound coming out from the preamp, and its use must be somehow counterbalanced with the treble knob of the preamp: if they are both too high their effect is summed, and the distorted channel ends up sounding like nails on a blackboard.
It adds attack to the sound, aggressivity, but it takes away some body on the mid range area, and progressively takes our hi gain tone towards a "Pantera"-like type of sound.
The ideal position is from twelve o'clock to 3 o'clock, according to how much aggressivity we are looking for, but if the amp sounds very dark we can push it more, maybe being a bit conservative with the treble control.

- Resonance, on the other hand, works for the low end in the same way Presence works in the high end: it boosts the bass frequences, and usually we're not talking about the lower mids, but really just the lower ones, the "oomph" you get from the palm muting.
Dial in too much and the sound will become uncontrollable, especially when recording, but live if our guitar tone is too weak we can move it a bit higher than unity to have that cool rebound that is needed when muting the strings. On a general level, though, it's not suggested to push it more than 12 o'clock.


Hope this was helpful!


Become fan of this blog on Facebook! Share it and contact us to collaborate!!

sabato 22 giugno 2019

TRIDENT IR PACK: FREE impulse response suite exclusive for Guitar Nerding Blog!


Hello and welcome to this week's article!

Today we are talking about the result of our IR creation experiments, lasted for months, done my me and my friend Dano (Thank you man!) in our rehearsals room, from which I have written my How to capture an Impulse Response from an amp article (click here to read it!).

The result is a custom Ir pack that I have called Trident IR Pack, and it's a pack consisting of 14 48khz impulses created using the power amp section of a Marshall JVM Vintage Modern head, into two cabs, a Marshall 1960 4x12 and an Orange 2x12.

The impulses were captured by two microphones, a Shure Sm57 and a Sennheiser e609, two industry standards, through Presonus Xmax preamps.

There are serveral impulses, taken from the microphones in various positions, and each one has a naming code, which must be interpreted this way:

gnb = Guitar Nerding Blog
mar jvm = Marshall JVM Head
mar412 = Marshall 4x12 cab
org212 = Orange 2x12 cab
57 = Shure sm57
e609 = Sennheiser e609
45deg = the microphone was at 45 degrees, pointing towards the center of the speaker
center = the microphone was pointing straight to the center of the speaker
dustcap = the microphone was pointing to the sweet spot between the dustcap and the cone
edge = the microphone was pointing to the edge of the cone

For best results I suggest you to blend 2 impulses with a cab loader such as Ignite Amps NadIR.

Let us hear your creations using this pack and help us spreading the word!

Enjoy!


CLICK HERE TO DOWNLOAD TRIDENT IR PACK!